There has always been confusion regarding the meaning of “measurement” and “inspection and testing.” Sometimes, they are incorrectly used as synonyms to generically indicate “controls” that must be carried out on an article. Let’s try to clarify this. “Measurement” means verifying dimensional and physical characteristics, such as dimensions, shape, weight, or thickness.
“On the other hand, “inspection” means checking the cosmetic appearance, features, or the presence of defects, such as inclusions, cracks, or other irregularities. Meanwhile, “testing” is the process of verifying compliance with the functional specification, also through destructive means.
Now that this is clarified, it’s important to note that this article will focus on measurement. Measurement is present in different phases of the glass manufacturing process, primarily in the cold end, as well as in the inline manufacturing process or in a Quality Control Laboratory, using go/no-go gauges, manual pressure gauges, or through semi-automatic or automatic systems.
The use of go/no-go gauges and manual pressure gauges has several drawbacks, such as:
- No quantitative information is available about the size of the problem.
- Results depend on the operator’s skill.
- A set of go/no-go gauges is required for each item in production.
- Costs associated with purchasing, managing, and periodically calibrating a large number of hard gauges.
Manual measurement is an intensive process without data collection, statistics, process trend detection, or complete information available for intervention in the process. In other words, if a problem is detected, there is no information to address it. The most likely consequence is a process that is out of control.
For all these reasons and more, any glass packaging manufacturer will eventually have to face the decision to switch from manual to automatic measurement.
When this decision is made, the next step is to choose the solution from those available in the market.
It should be noted that there is no absolute best solution; the best solution is the one that fits the characteristics of the glass manufacturing plant and the range of items produced. So, what should be taken into account?
Firstly, the investment in an automatic measurement system should last approximately 10 years. Therefore, a wrong decision can have a quite serious impact.
A good practice is to take the time to think about the needs that your production process requires, define the level of automation required (fully automatic or semi-automatic). Also, consider that a fully automatic flexible machine with multiple transport systems, operating 24/7, will drastically reduce the need for labor, leading to a short return on investment (ROI). You should also consider the following:
- Seek alternative solutions and evaluate them carefully.
- Ensure that the machine truly meets your needs.
- Do not only look at catalog specifications.
- Visit the supplier’s plant and conduct tests on the machine.
- Total flexibility to measure everything produced.
- Easy and intuitive programming to facilitate machine use for both inexperienced operators and experts.
- The possibility of future upgrades allows for a machine capable of meeting future needs.
- Verify compatibility and the level of integration with the manufacturing software (MES) used in your plant.
- Do not limit your research to a single supplier. Check the supplier’s references, credibility, and, above all, experience in metrology, as well as their after-sales service.

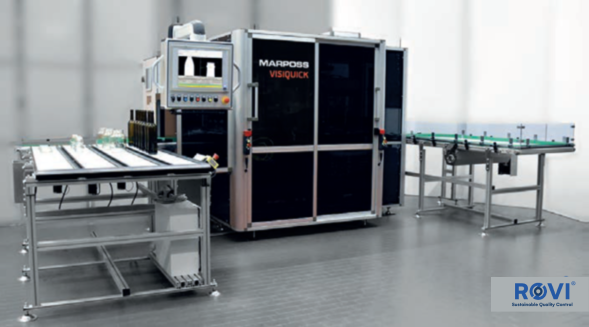
FIG. 1
Marposs can provide solutions with different levels of automation to meet the needs of any customer and production environment. The solution with the highest level of automation and the greatest number of available controls is VisiQuick, a fully flexible automatic machine with automatic handling (Fig. 1).
This machine enables measurement without any operator intervention and without any significant changes in the workflow, covering a wide range of containers regardless of their dimensions, shape, and color. VisiQuick can measure:
- External dimensions using optical technology (cameras), weight, push-up or base, inner diameter of the mouth, and profile, with Marposs’ patented contact technology.
- Wall thickness using chromatic confocal technology.
- Labeling area profile (concavities and protrusions) with optical technology patented by Marposs.
The VisiQuick system can be supplied with all the aforementioned measurement stations or only with some of them, with the possibility of future upgrades. The system can be powered by one or more bottle/container conveyors.
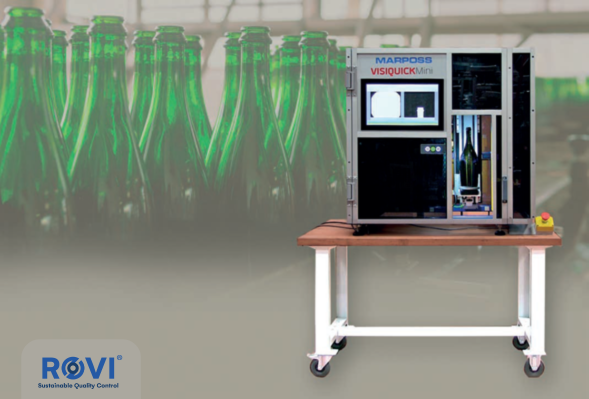
This solution is highly convenient and efficient, as it allows for the measurement of different container batches without the need for an operator or supervision. VisiQuick can also be fed with samples diverted directly from the production line. An alternative solution to VisiQuick is VisiQuick-mini, a flexible semi-automatic system with manual loading/unloading of containers (Fig. 2). It can measure all external dimensions using optical technology (cameras) and optionally weight.
Both VisiQuick and VisiQuick-mini are suitable systems for measuring various types of containers, including bottles and jars used in the beverage and food industries, pharmaceuticals, as well as in the production of perfumery or cosmetic packaging.

FIG.2
With a single system, glass container manufacturers can accurately and automatically perform all the checks that, with manual gauges, would require four to seven qualified operators and many more. This comes with the additional advantage of collecting data and real-time detection of any production issues.
Both VisiQuick and VisiQuick-mini are compatible with the most popular Production Control Software (MES) in the industry.
In addition to these products, Marposs can assist customers with training, maintenance programs, and after-sales service. Celebrating 70 years of activity, Marposs is present in 34 countries with its own sales and service organization.
For more information, contact us at +1 847 363 0191 / +1 847 363 0177


